Risotto cooking lesson with Mizue
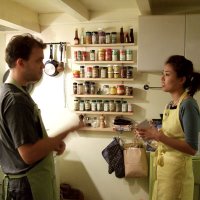 Mizue's boyfriend, John, was going to come back from Taiwan and she wanted to cook for him! So she came by to learn how to prepare a risotto! I posted a squid ink risotto earlier on. The basic recipe for all risotto's is the same. Go check it out here.Instead of the squid and the ink, we went ahead and used some saffron (available in small glass jars at Trader Joe's). At the end, we also added some sherry and a lot of parmesan cheese.
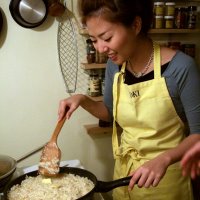 Before Mizue came over, i already started preparing some veal shanks (ossobucco) to serve with the risotto. We had a great time cooking together and i think she'll be back soon for another lesson!
Mizue, how did the evening go with John?
Tuna Patty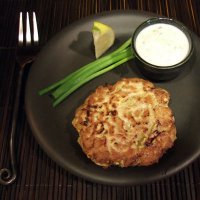 This is a really wonderful and light appetizer that could easily be converted into a nice summer lunch as well. If I'd do this as a lunch, i would probably serve a bit of toasted bread and a salad with it. Important is, that you use really good quality tuna, preferrably sushi quality.
Appetizer for 2 people:
Ingredients:1 nice and superfresh tuna steak, finely cut into small piecesfreshly ground salt and pepper1/2 yellow onion, finely chopped1 egg yolk2 tablespoons olive oil1/2 cup non-fat yoghurt1 spring onion, finely chopped2 spring onions for decoration
slice of lemon
Instructions:Mix tuna, onion, egg yolk and freshly ground salt and pepper in a bowl. By hand, form a patty with the tuna mix. Press it enough to make it as firm as possible.For the sauce, combine yoghurt, finely chopped spring onions and salt and pepper in a small bowl. Cut the 2 remaining spring onions into about 10 cm pieces.Heat the olive oil over high heat in a small non-stick skillet. Once the oil starts smoking a bit (when it's really hot), carefully place the tuna patty into the skillet. Grill it about 1 minute on one side without touching it, then flip it and give it another minute. Arrange the patty, the yoghurt sauce, the lemon slice and the spring onions nicely on a plate. Before eating, squeeze the lemon over the patty and enjoy!
Yoko's Famous Pizza - Step by Step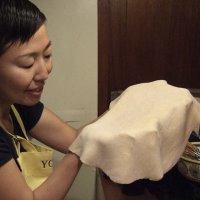 Some of you already had the pleasure of eating Yoko's pizza. Simply spoken, this is the real italian pizza! Thin crust, crispy, flavorful, simple! No BBQ-Chicken or Triple-Cheese extravaganza here. This is just a very simple pizza with good quality ingredients the way you would eat it in italy. One of the secrets lies in the dough. To get a nice dough, you'll have to do it yourself, but it's very quick and easy! I can highly encourage everyone to do the dough by themselves. It takes almost no time and the results are astonishing.for 2 pizzas 14" each:for the dough:300 g white flour200 cc (ml) water (filtered or bottled)1 pack of yeast (should be about 7 g)1 teaspoon saltfor the tomato sauce:1 can tomatoes (i found that it's just as good with canned tomatoes instead of using fresh tomatoes, unless you don't mind cooking the tomato sauce for hours)pinch of sugar
2-3 cloves of garlic, chopped1 teaspoon dried oreganofreshly ground salt and pepper2-3 tablespoons extra virgin olive oilfor the topping:mozarella cheese (should be soft when pressing on it)8 slices very thin cut prosciutto (domestic is fine)some dandelion leaves, or arugula and fresh basil insteadjuice of 1/4 lemonsome drops of olive oil
Instructions:
The tomato sauce:Put some olive oil into a large skillet and start heating at medium heat. Add the garlic and reduce the heat to low. Sauté the garlic in the oil for at least 10 minutes. That means you'll have to keep the heat quite low in order not to burn the garlic. Add the tomatoes (Peeled if you're using fresh ones. How to peel them? Boil them in water for about 1 minute, that makes it easy to peel off the skin). Add a pinch of sugar and season with salt and freshly ground pepper. If you're using canned tomatoes, sauté for about 10 minutes until most of the juice is gone, then add the oregano. Using fresh tomatoes requires to sauté longer. In that case, the sauce actually really gets good when you cook it over very small heat for several hours. In each case, sauté long enough for most of the juice to absorb. Taste the sauce and add more spices if needed.
The dough: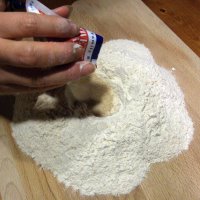 Make sure you have a big enough, clean working surface to prepare the dough. It makes things a lot easier. Put the flour on the surface, making a little mountain. On top of the mountain, add a little hole and pour in the yeast.
Distribute the salt around the mountain of flour.
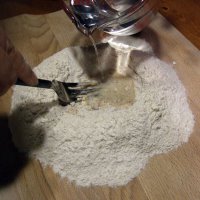 Add bit by bit of the water into the hole on top, mixing in some of the flour with a fork. Only mix in as much flour to fully absorb all the water. When all the water is absorbed, add more. You don't necessarily need to use the whole 200 cc if you don't need it.
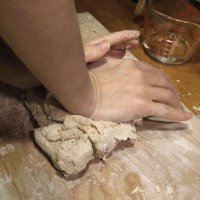 This is the fun part! Knead the dough! Do it hard! Really push and pull it, put all your weight on it. You can get rid off all your aggression and frustration from the day!
 When you have a smooth, homogeneous dough, split it in half. Put one half away for later (for a second pizza). In theory, you should let the dough sit for about one hour so it can grow! But Yoko's too hungry to wait and it works just fine without waiting! Now it's also time to start preheating your oven to 550 F.
 Have some extra flour and a strainer ready. Powder your working surface and your dough a bit so it won't stick in the next step.
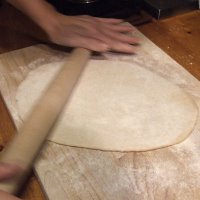 Use a rolling pin to make a nice and flat dough as thin as possible. There's many different kinds of rolling pins available. Yoko uses this one from Sur-La-Table.
 Those Pizza Screens are amazing! No sticking (rub them a bit with some olive oil and a kitchen paper), and a beautiful crispy dough! We have two 14" screens. They're available at Surfas and I think Sur La Table has them as well.
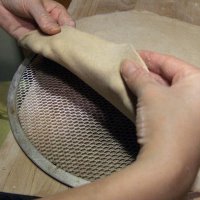 Carefully place the dough on the screen. Pull it a bit on the edges so the screen is entirely covered by the dough.
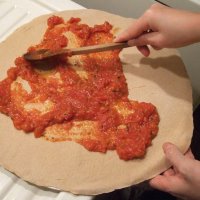 Distribute half of the tomato sauce over the dough. Keep half for the second pizza!
 Sprinkle half of the mozarella over the tomato sauce. Just crumble the mozarella with your fingers and evenly put it onto the pizza.
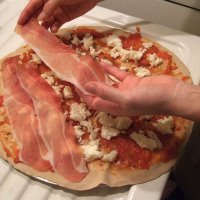 Now add the slices of prosciutto on top. You want them to be on top so that can get nice and crispy in the oven. At this point, you can also add a few drops of olive oil over the whole pizza.
 Into the middle of the preheated (550 F) oven she goes!
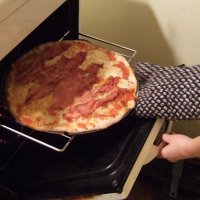 After about 7 minutes the pizza should be ready! Make sure the dough is crispy and the pizza has a nice overall color. If that's not the case yet, give it an extra minute or so. But be careful not to burn it, otherwise it will get really dry.
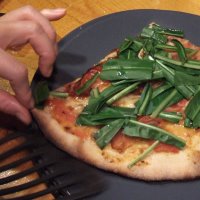 Tear up some dandelion leaves (or arugula and basil) and press some fresh lemon juice over the herbs and the pizza! This really gives it a beautiful freshness! This idea by the way i got from a cooking DVD by Jamie Oliver.
 For the second pizza, Yoko used fresh italian parsley, black olives and anchovies instead of the prosciutto.
 We opened this bottle Yoko got from Ben for her birthday. This is the nicest Zinfandel i ever drank and one of the nicest wines i've had in a while. Thank you so much Ben! Amazing!
My Christmas Dinner - Thai Style The kitchen looked like a bomb exploded!
I made little seafood cakes (Haw Mok Thalay) in banana leaf cups for appetizers (very delicious!).
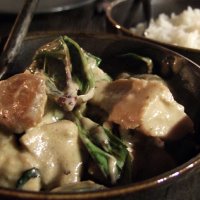
For the main course a crispy fried pomfret with a mango salad topping, decorated with cashew nuts. And a green chicken curry with rice.
Then for dessert a steamed acorn squash custard (one of the best desserts i ever made) and a few sticky rice cakes with banana.Merry Christmas!Seafood Cakes for 2 people:for the banana leaf cups:1 big banana leaf (Whole Foods often carries them)toothpicks4 whole thai basil leavesfor the topping:80 ml coconut milk (from a can or powder)1/2 teaspoon rice flour2 very thinly sliced kaffir lime leaves2 fresh, deseeded and thinly sliced red chili
4 cilantro leaves
for the seafood mixture:50 g boneless white fish fillets, cut into very thin slices (i used Orange Roughy)50 g fresh shrimp, peeled and cut into tiny pieces50 g squid tubes, cut into tiny pieces1 egg, beaten1 tablespoon fish sauce150 ml coconut milk10 g finely chopped thai basil leaves (horapa)
2 very thinly sliced kaffir lime leavesfor the spice paste:2 hot red chilies, dried2 big cloves of garlic2 slices galangal (thai ginger)1 slice regular ginger1/2 teaspoon grated kaffir lime rind1 teaspoon chopped cilantro root5 black peppercorns1/2 teaspoon seasalt1/2 teaspoon dried shrimp paste, roasted
Instructions:
 Start by making the banana leaf cups. With scissors, cut 8 circles out of the banana leaf, each with about a 15 cm diameter. Put two circles on top of each other. Make a fold along the edges about 4 cm tall and secure it with a toothpick. Do this 4 times for each cup at equal distance from each other. Cut the toothpicks to the same height as the cups. This is a bit a tedious process, but you'll end up with those cute banana leaf cups. If you don't want to do this hassle, you can use small ceramic cups (heatproof!) which are about the same size. Put one basil leaf into each cup.Now grind all the spice paste ingredients together in a mortar with a pestle. Mortar and pestle are crucial if you're serious about thai cooking. You can get nice and big ones at Silom Supermarket. In a seperate bowl, mix all the ingredients for the seafood mixture together, adding coconut milk last bit by bit.
Now combine this seafood mixture with the spice paste and mix well.
Fill the banana leaf cups with the mixture and steam the cakes for about 15 minutes. You can use a rice cooker for steaming (very convenient) or boil some water in a big pan, put some kind of grid or anything else the cakes can sit on onto the bottom of the pan.
While the cakes are beeing steamed, mix coconut milk and rice flour (for the topping) in a small pan. Bring to a boil and constantly stir until the mixture thickens. Once thickened, remove from the heat and let it cool.
After the cakes are finished, put a spoonful of the topping mixture onto each cake and decorate with the kaffir lime leaves, red chili and cilantro leaf. Put the cakes into the steamer for one last minute, then serve! Ouff...
This sounds like a lot of work (it's not so bad besides the banana leaf cups), but it's worth it!
Fried Pomfret with Mango Salad
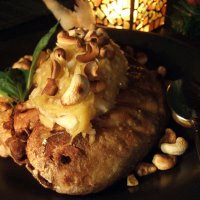 for 2 people:
the fish:
1 pomfret (Ranch 99 usually has them)1 cup oil (for deep frying)
2-3 tablespoons tapioca flour (optional, also from Ranch 99)
for the mango salad:
1 unripe mango, roughly grated (mango should be as hard as possible)
2 shallots, sliced
2 fresh chilies, thinly sliced1 tablespoon dark brown sugar
1-2 teaspoons fish sauce
juice of half a lime
2 tablespoons roasted cashew nuts
Instructions:
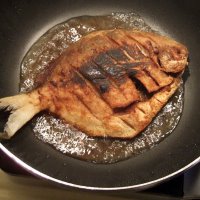 Clean the fish, scale it on both sides with a sharp knife. Rub tapioca flour all around the fish. Set aside.
Add all ingredients for the mango salad in a bowl. Mix well. If it's not salty enough, add more fish sauce, if it's not sour enough, add more lime juice.
Deep-fry the fish preferrably in a wok. Fry it until it's crispy and golden on both sides.Take the fish out of the pan and drain as much of the oil as possible.
Put the fish on a plate, arrange the mango salad on top of the fish and decorate with the cashew nuts.
To get the fish meat off the bones, scrape it with a spoon.
Green Chicken Curry
for 2 people:
Ingredients:
1/2 pound chicken (i prefer thighs, you can also use breast)
2 tablespoons oil
salt and pepper
1 cup coconut milk
1 tablespoon green curry paste
4 kaffir lime leaves
1 tablespoon fish sauce
1 teaspoon sugar
100 g thai eggplant, each cut into 4-6 wedges
handful of thai basil (horapa)2 fresh red chilies, deseeded and cut into strips
 Instructions:
Start steaming some jasmin rice in a rice cooker (hopefully you have one, they're great!).
Heat the oil in a large non-stick skillet. Quickly fry the chicken over high heat without entirely cooking it (about 3 minutes total).
Put aside on a plate.
Put 1/2 cup of the coconut milk into a large skillet. Heat over medium heat until it begins to have a bit of an oily sheen. Add the green curry paste, the kaffir lime leaves, the fish sauce and the sugar. Stir well. Bring the sauce to a boil, then add the eggplants. Reduce the heat, cut the chicken into bite size pieces and put it back into the skillet and simmer for another 10-15 minutes until the chicken is done and the eggplants are softened. At the end, add the fresh basil leaves and the chilies. Serve with steamed rice.
Acorn Squash Custard
for 2 people:
Ingredients:
1 acorn squash (or small pumpkin)
2 eggs (the real authentic recipe uses 1 duck egg to replace 1 chicken egg)
100 ml coconut cream
50 g dark brown sugar
Instructions:
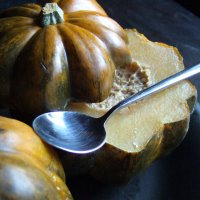 Cut off the top of the squash (about 1/4 of the height) and scoop out all the seeds and fibers. Keep the cut-off part as a lid. Also cut the squash a bit at the bottom to make it stand stable.
Put eggs, coconut cream and sugar into a bowl and mix very well until the mixture is frothy. Again, my great mixer from Betty Bossi did a wonderful job!
Pour the mixture into the squash and fill it as much as possible. Put the "lid" back onto the squash and place the whole thing into a steamer (rice cooker or big pan, just make sure the squash doesn't directly sit in the boiling water).
Steam for about 30 minutes. The squash should have softened quite a bit and the cream inside should have hardened. Remove from the steamer and let it cool. Put the whole dessert into the fridge for a few hours before serving. To serve, either directly eat it with spoons from the squash (romantic dessert for two?!), or cut the squash into thin (about 1 cm) slices and put on plates.
Sticky Rice Cakes
for 2 people:
Ingredients:
80 g sticky rice (sometimes called glutinous rice or sweet rice), soaked in water for 1 hour
150 ml coconut milk
1 tablespoon sugar
little bit of salt20 g dried red beans, soaked overnight then boiled until soft
1 small ripe banana (baby bananas work great for this)
2 pieces banana leaf (from Whole Foods), cut into about 10 x 25 cm stripes
 Instructions:
Drain the rice. Put rice, coconut milk, sugar and salt into a large, non-stick skillet. Over medium heat, bring to a boil and cook until all the coconut milk is absorbed by the rice (about 10-15 minutes). Remove from the heat and let it cool.
Make a pile of rice, red beans and banana slices on each banana leaf. Use up all the ingredients for both banana leaves. Roll up the leaves and make the mixture inside nice and firm while rolling.
Put the rolls into a steamer and steam for about 25 minutes.
Before eating, unwrap the rolls (discard the banana leaves) or cut them first into smaller pieces (just like sushi rolls).
Ricotta Gnocchi
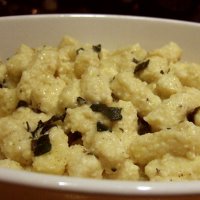 This is an old recipe that was released by Betty Bossi in 1992. The ricotta gnocchi are not as heavy as the more traditional potato gnocchi and make for an excellent appetizer.
Appetizer for 2 people:Ingredients:
1 whole egg
1 egg yolk
200 g ricotta
50 g grated parmesan cheese
some more parmesan to sprinkle over at the end
30 g flour
30 g semolina (availabe by weight at Whole Foods)salt and pepper
nutmeg (preferrably freshly ground)
2-3 tablespoons butter
1 handful of sage, chopped
Instructions:
Put egg and egg yolk into a bowl, mix well. Add ricotta, bit by bit and mix with the eggs. Put parmesan, salt, pepper and nutmeg (to taste) and mix everything.
In a seperate small bowl, mix the flour and semolina together and add it to the ricotta paste.
Leave it sitting there for at least 1/2 hour.
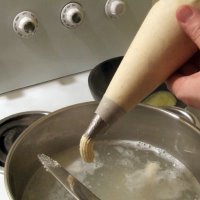 To make nice looking gnocchi, a decorating bag works great. Sur-la-Table (one of my favorite cook stores) sells them. You don't need to buy a whole set, just the bag and one metal piece to insert will do fine.
If you don't want to buy the bag, you can also use a spoon instead to create gnocchi-like shapes.
Bring water to a boil in a big pan and add some salt. Reduce the heat so the water only boils very gently.
Put the ricotta paste into your bag and press out about 2 cm long pieces of gnocchi directly into the water. Use a knife to cut off the gnocchi from the bag. This works best with two people. One person squeezing out the gnocchi from the bag, the other one using the knife to make the gnocchi fall out of the bag. Don't stir! The gnocchi are very delicate.
 In the meantime, melt some butter in a small skillet, add the sage and sauté over medium heat until the sage becomes a little bit crispy but not burnt!
The gnocchi are ready once they're floating on top of the water (about 3 mins total). Carefully remove them from the water. A big spoon with holes or a skimmer to drain the water works best.
Arrange the gnocchi on plates and pour the butter/sage sauce on top. Sprinkle with parmesan. I thought the Bogle Merlot went well with this dish.
Salmon with Noodles
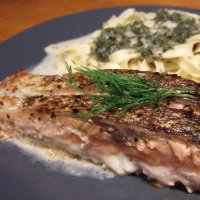 This is a very quick and easy dish to prepare, and very tasty! Make sure you buy really fresh salmon because you want to serve it still a bit red inside.
For 2 people:
Ingredients:1 8 cm long piece of fresh salmon3-4 tablespoons extra virgin olive oilfreshly ground salt and pepper1 shallot, choppedhandful of fresh dill, choppedsome twigs of dill for decoration1/2 cup white wine3-4 tablespoons sour cream (or creme freche)1 teaspoon "Better Than Bouillon" chicken base (optional)1/2 lemonnoodles (any kind you like)
Instructions:
Start boiling some water in a large pan.
 Cut the 8 cm piece of salmon in half lenghtwise. Score the skin side with a sharp knife lengthwise 2-3 times. Pour about 2-3 tablespoons olive oil into a plate and rub all sides of both salmon pieces in the oil. Sprinkle the skin side with the freshly ground salt and pepper and really rub it in. Don't be shy doing this! Use enough salt and pepper as the sauce and the noodles will stay pretty mild. Put the salmon aside.In a small sauce pan, heat 1-2 tablespoons of the olive oil, add the shallot and sauté for about 1 minute until golden. Add the chopped dill, mix everything well and pour over the white wine. Reduce the heat and let the sauce simmer.Start heating up a large non-stick skillet without adding any oil! In the meantime, the water for the noodles should be boiling as well. Add some salt to the boiling water. Check on the package of your noodles how long they take and deduct a minute or so because you really want to cook them al dente! The salmon takes about 4-6 minutes, depending on how thick the pieces are. You want the noodles and the salmon to be done about the same time. Do the math!
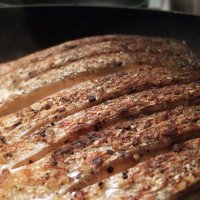 Put the fish skin side down into the hot skillet, reduce the heat to medium and don't touch the salmon at all for 3-4 minutes, depending on how thick your salmon pieces are. The goal here is to make the skin nice and crispy with a beautiful golden color but without burning it!Flip the salmon and give it another 1-2 minutes. During that time, also add the sour cream (or creme freche) to the shallot/dill sauce. Stir well and add salt and pepper to taste. You can also add a teaspoon "Better Than Bouillon" instead (the chicken base from Trader Joe's). Heat up the sauce one last time.Once the noodles are al dente, remove them from the water and put them on the dishes. Serve the salmon skin side up on the dishes next to the noodles. Pour some fresh juice from the lemon over the salmon. Decorate with the dill twigs. Pour the dill sauce over the noodles. Serve at once.
Risotto with Squid Ink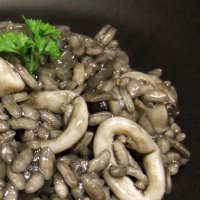 I like the way this risotto looks like on a plate! The ink of the squid makes it look very dark or almost black, depending on how much ink you put inside. The only place where i could find squid ink so far, is Surfas in Culver City.
For 2 people:
Ingredients:2-3 cups stock (the "Better Than Bouillon" base is great)a few sage leaves (optional)2-3 tablespoons olive oil1 yellow onion, chopped1 cup arborio rice (from Trader Joe's)1 cup cheap white wine for cooking1/2 pound fresh squid (tubes and/or tentacles), cut into 1 cm stripes2 garlic cloves, chopped1 tablespoon butter (preferrably unsalted)freshly ground salt and pepper1 little package of squid ink (from Surfas)
Instructions:Start by making the stock. 2-3 cups water and about 1 teaspoon of the "Better Than Bouillon" stock. I used the Lobster Base which is available at Bristol Farms grocery stores. But you can also use the Chicken Base, which is the only one, Trader Joe's carries (up until now at least). Put a few sage leaves into the water if you like. This gives it a little nice extra fragrance. Once the bouillon is dissolved, keep the stock simmering over low heat.Put the olive oil into a large saucepan, add 1/2 onion (keep the other half for the squid) and sauté for about 5 minutes until they're softened and golden. Add the rice and stir until all the grains are coated with the olive oil. Pour 1/2 cup of the white wine over the rice and stir until it's completely dissolved. Now start adding stock, ladle by ladle. You don't want too much liquid in the rice. You only add more stock, when most of it is dissolved or "swallowed" by the rice. The rice is like a sponge! This process takes about 20 minutes. Keep tasting the rice to see if it's cooked. You still want it to be slightly firm in the center.
During those 20 minutes, you also start preparing the squid: in a small saucepan, heat some olive oil, add the other half of the onion, add the garlic and sauté for about 1 minute. Add the squid stripes, mix everything well quickly. Pour 1/2 cup of the white wine over the squid, reduce the heat to very low and cover the pan with a lid. Let it simmer while you cook the rice in the other pan. Make sure it simmers with closed lid for at least 10 minutes.
 When the rice is ready, add the squid from the saucepan, the butter and salt and pepper. Remove the pan from the heat and mix in the squid ink. Stir to evenly blacken all the grains and serve! Put a little piece of parsley on top for decoration if you like.
I served a Fetzer Cabernet Sauvignon with this dish. I think this is a great wine for many dishes and it's very much worth the price! ($ 5.99 from Trader Joe's).
Meringuesupdated
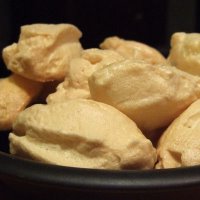 I wanted to do something with the egg whites that were left from the gnocchi dish below. Meringues are almost only egg whites! Egg whites can be easily frozen as well for later use. Check out Mr. Blitz's comments to this post about the details. Thank you, Mr. Blitz!Ingredients:5 egg whites
2 tablespoons white sugar
1 tablespoon amaretto (the usual recipe uses a bit of vanilla extract instead)Instructions:
 Put the egg whites into a mixer or a bowl if you're going to whip the eggs manually. I used my super-duper Betty Bossi mixer from Switzerland. Nothing beats this one! After the egg whites harden a bit, mix in the sugar and the amaretto (or vanilla extract). Beat the whites until they're really firm. It's firm enough, if you can turn the bowl upside down, and the mixture doesn't fall out!Place some parchment paper, or even better, a special non-stick baking sheet on your oven grid or whatever you have to put things on in your oven. Thanks again to Mr. Blitz for those recommendations. When i did this recipe (and i'm not much of a baker), I used aluminum foil and had some sticking problems. So i would suggest not to use aluminum foil.
With a spoon, place small, artistic looking shapes onto your parchment paper or baking sheet, leaving some space between because the meringues will grow a bit in the oven!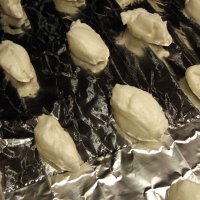 Preheat the oven to 250 F.Put the meringues into the middle of the oven and let them bake for 1 hour. The important part is, to not open the oven door while the meringues are in there! After 1 hour, reduce the heat to 200 F. Let them bake for another 20 minutes. Then reduce the heat to 175 F. After another 20 minutes, turn off the oven but leave the meringues in there for yet another 20 minutes. After a total of 2 hours, open the oven door and remove them.I think they taste best right after removing them from the oven. Meringues are very sensitive to humidity and you might end up with sponge-like meringues if they get exposed too much. I really don't consider myself a pastry or baking guru. If you have any other comments or suggestions about this, please don't hesitate to post them!
Ricotta Nocken with Pesto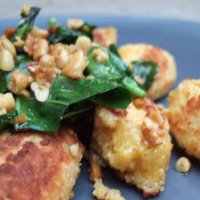 If you have some old leftover bread, this is a good recipe for a quick lunch. I had some really rock-hard bread, just the perfect thing for this dish!Serve this dish with a fresh arugula salad with a simple olive oil, balsamic vinegar dressing, sprinkled with some freshly ground pepper.For 2 people:For the Gnocchi:150 g ricotta60 g finely ground old bread5 egg yolks (Yes, it's a lot! And what can you do with the egg whites? Check out the meringues above.)salt and pepperFor the Pesto:handful fresh basil leaveshandful fresh mint leavesroughly chopped pine nuts3 garlic cloves, choppedextra virgin olive oilsalt and pepper (preferrably freshly ground)Instructions:
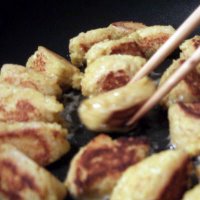 Mix ricotta, finely ground bread powder and egg yolks together in a bowl. Add salt and pepper.Create about 3 cm (1,5 inch) pieces from the mixture. The best way I think, to do this, is to use two spoons and move the paste from one spoon to the other, back and forth, again and again, each time trying to shape the pieces and make them more firm. Place them on a plate.Heat some olive oil in a flat, non-stick skillet over medium heat. Put the gnocchi into the skillet and fry them until they look golden all around. Be careful not to make them fall apart when you try to turn them. Chopsticks work great for that! Actually, Yoko did that for me because she's better in handling the chopsticks :-)
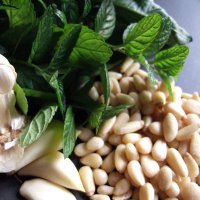 Once they're ready, or a bit before then, heat some more olive oil in another, smaller skillet.Add garlic and pine nuts, giving them a lightly brown color.Place the gnocchi on the dishes. Sprinkle them with the fresh basil and mint leaves. Pour the garlic, pine nut, olive oil mixture over the gnocchi. Serve!
Chicken From the Oven This is always a favorite. A very simple but tasty dish. Tonight I prepared it with a few oven baked potatoes and a dandelion salad.
Ingredients:
1 whole chicken
mustard (tonight I used horseraddish instead)
ground paprika
handful twigs of fresh rosemary
handful twigs of fresh thyme
freshly ground salt and pepper
1 whole lemon
Instructions:
Preheat the oven to about 425 F.
Wash the chicken inside out and dry with kitchen paper or a towel. Season the inside with a lot of freshly ground salt and pepper. Squeeze some lemon juice inside. Fill the chicken with the rosemary and thyme. Squeeze some more lemon juice inside and leave the squeezed lemon pieces in the chicken. Really stuff the chicken with the herbs and lemon!
Place the chicken in an oven-proof dish. Rub the mustard on the whole chicken. Cover all the spots. Sprinkle paprika, freshly ground salt and pepper around the whole chicken to cover all the skin. Don't be shy using enough of all the ingredients!
Place the chicken into the preheated oven. Bake for about 40 minutes, then turn the chicken upside down. If you're doing some potatoes as well, add them now into the same dish as the chicken. Use some salt and pepper and maybe some fresh thyme on the potatoes as well. Then bake everything for another 40 minutes.
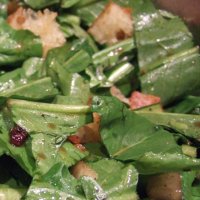 Dandelion greens are a bit bitter but very nice prepared with good balsamic vinegar, olive oil, small pieces of bread and bacon that have been fried in a pan first, and freshly ground salt and pepper.
Fish Curry A spicy fish curry recipe i found in the great indian cookbook 1000 Indian Recipes and modified a bit to my taste. Serve it with some steamed rice and maybe a yoghurt type salad to balance the spices.
For 2 people:
For the marinade:2-3 dried red chile peppers ( i still have the ones from Thailand, so i only use 1!)1/2 tablespoon coriander seeds1/2 teaspoon black peppercorns1/2 teaspoon black mustard seeds1 small onion, roughly chopped2 large cloves garlic, peeled1/4 teaspoon ground turmeric1/2 teaspoon saltThe fish and the sauce:3/4 pounds of any firm fish ( i used a pink grouper)
1/4 cup coconut milk (best bought in a can)2 tablespoons extra virgin olive oil, use walnut or peanut oil for different flavor1 onion, thinly sliced1/2 inch piece fresh ginger, finely cut into thin sticks1 tablespoon white vinegar2 tablespoons fresh cilantro, chopped
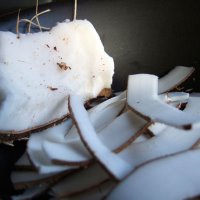 I went a little overboard and tried to create the coconut milk from scratch. First and last time! It was fun, but it's not worth the effort. It took about one hour to get 1/2 cup of coconut milk. If you really need to know how to do it, email me, otherwise just buy a can!
Instructions:
 Put all the ingredients for the marinade into a mortar and pound them into a smooth paste. If you don't have a mortar, you should really buy one! It's great for so many things. Silom Supermarket sells really nice ones imported from Thailand. I found that out after i brought a 15 pounds heavy mortar in my luggage from Thailand!
Cut the fish into about 1 1/2 inch pieces, put them into a bowl, add the smooth marinade and mix everything well without ruining the shape of the fish. Cover and let it marinate in the fridge for at least 1 hour.
 After marinating is done, heat 1 tablespoon of the oil in a non-stick pan. Medium heat. Cook the sliced onion and ginger sticks for about 10 minutes without burning them. Put the onion/ginger mix into a bowl.
Add another tablespoon of oil into the pan and fry the fish pieces on all sides until golden, about 4 minutes.
Add the coconut milk and simmer over low heat for about 5 minutes.
Slowly mix in the vinegar. Stir very gently only! Let the flavors blend for another 2-3 minutes on low heat. To check if the fish is done, cut a piece. It should be opaque inside.
Serve it on a nice dish and sprinkle the cilantro on top.
 Beer goes well with it. I had this nice beer in the fridge that was given to me by a co-worker. It's 8.5 % with a strong flavor and a slight honey after taste. Mmmm!
Spaghetti Alla Foriana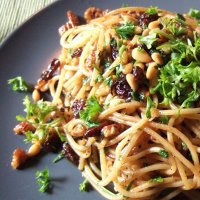 This is a recipe i got from Robert, a great cook and gourmet i met at Heidi's thanksgiving dinner.
The recipe is from Ciro & Sal's Cookbook.
A very nice blend of different flavors from nuts, anchovies, raisins and chile.
For 2 people:
Ingredients:
1/2 pound spaghetti
1/3 cup extra virgin olive oil
2 big garlic cloves, finely chopped
6 anchovy fillets, rinsed and dried
1/4 cup walnuts or pecans, broken into quarters
1/8 cup pine nuts, lightly toasted and roughly chopped
1/4 cup dark raisins
1 teaspoon dried oregano
pinch of hot red pepper flakes, or chopped chile
pinch of freshly ground black pepper
2 tablespoons finely chopped fresh parsley
Instructions:
Most importantly, cook the spaghetti al dente! So if you're not a fast cook, you might want to start preparing the sauce first, before putting the spaghetti into the boiling water.
Heat the oil in a large, non-stick skillet. Add the garlic and the anchovies over low heat until the garlic has a golden color. Don't burn the garlic as it gets bitter when burnt. Stir until the anchovies have completely dissolved.
Add walnuts (or pecans), pine nuts, raisins, oregano, black and red pepper (or chile) and simmer for about 4 minutes.
Drain the spaghetti and put it into the skillet with the sauce and mix everything well together. Add one tablespoon of the parsley and toss quickly.
Serve the pasta on individual plates or into a serving dish. Sprinkle the remaining parsley over the dish.
Happy Birthday, Robert!
 Mizue's boyfriend, John, was going to come back from Taiwan and she wanted to cook for him! So she came by to learn how to prepare a risotto! I posted a squid ink risotto earlier on. The basic recipe for all risotto's is the same. Go check it out here.
 Before Mizue came over, i already started preparing some veal shanks (ossobucco) to serve with the risotto. We had a great time cooking together and i think she'll be back soon for another lesson!


